
A tin can look comfortably large on a specification sheet and still be wrong once the real product is packed. A label adds a few millimetres, a rolled edge narrows the opening, an insert lifts the product closer to the lid, or a hinge takes away space exactly where one corner needs it.
Choosing the correct tin container size starts with the finished product and the usable cavity—not the outside dimensions alone. When comparing existing tin container formats, define how the product will actually sit, load and come back out before choosing the metal size.
What matters most
Measure the finished product in the position it will actually be packed, then allow for the insert, the tin’s internal structure and enough working clearance for loading and removal. The right size is the one that works repeatedly—not the smallest cavity the product can technically enter.
That distinction matters in real projects. A rigid item can fit the lower cavity but catch at the opening. A soft pouch can measure smaller when squeezed than it behaves on a packing line. A multi-pack can gain several millimetres because wraps and labels prevent the units from sitting perfectly parallel.
For buyers comparing existing molds, this inside-out approach is usually more useful than starting with a catalogue dimension and trying to force the product into it.
Product Orientation Changes the Size You Actually Need
The same product can require very different tin proportions depending on whether it lies flat, stands upright or sits on one narrow side. The orientation changes the footprint, the lid clearance, how an insert can be built and even how the product looks when the lid opens.
Fix that packed position before discussing a nominal tin size. A quick top-view sketch is often enough. If presentation matters, mark which side should face the customer when the package opens.
Measure the product as it will be sold
Do not measure a bare component if the packed item will include a paper wrap, label overlap, cap, sleeve, folded pouch or other permanent layer. Those details become part of the maximum envelope entering the tin.
Flexible products deserve extra care. Pressing a pouch flat against a ruler can create a number that looks precise but is useless during actual packing. Measure the relaxed shape the operator will handle.
What the useful measurement should capture
- Maximum finished length, width or diameter, and height
- Caps, seams, tabs, shoulders or other protruding points
- Any surface that should not rub against the metal or insert
- How the product needs to enter and be removed
Where normal production varies, check several representative pieces. An average is useful for process control; a realistic larger sample is usually safer for physical fit.
A Multi-Pack Should Be Measured as a Pack
If several products share one tin, single-unit dimensions are only the starting point. Build the real arrangement on a table and measure the row, layer or stack as a complete pack. Small differences accumulate, and wrappers often stop neighbouring pieces from sitting as neatly as a spreadsheet assumes.
Volume is not a substitute for geometry
Two products can occupy almost the same cubic volume and still need completely different tins. One may be long and narrow; another short and wide. Irregular products can also leave empty pockets that do nothing to improve fit.
For loose fills, the real filled condition matters more than a theoretical volume calculation. Settling and required headspace can change the working fill line, so capacity should be checked after the physical shape of the pack is understood.
Why Outside Dimensions Can Be Misleading
Metal forming uses part of the apparent space. Rolled edges can narrow the opening, the underside of the lid can sit lower than the external height suggests, and hinges or closure details can intrude only in one local area. This is why a product can appear to have enough total volume and still collide with the structure.
It helps to separate two questions: Can the product or loaded insert pass through the opening? And once it is inside, does the final cavity provide enough room in the packed position? A rigid tray may pass one test and fail the other.
A real size example from the CR Tin range
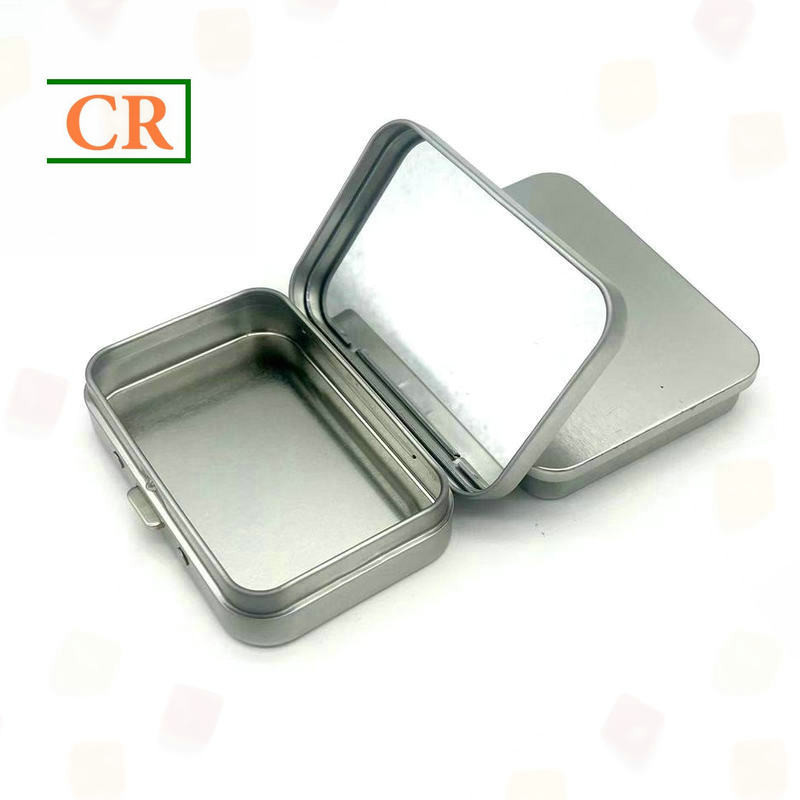
The Square Tin Box is listed at 125 × 125 × 45 mm outside and 121 × 121 × 43 mm inside. That difference belongs to this specific structure; it should not be copied as a universal deduction for another mold. The second example below is useful for a different reason: its open view makes the hinge, rolled edge and local closure area easy to see.
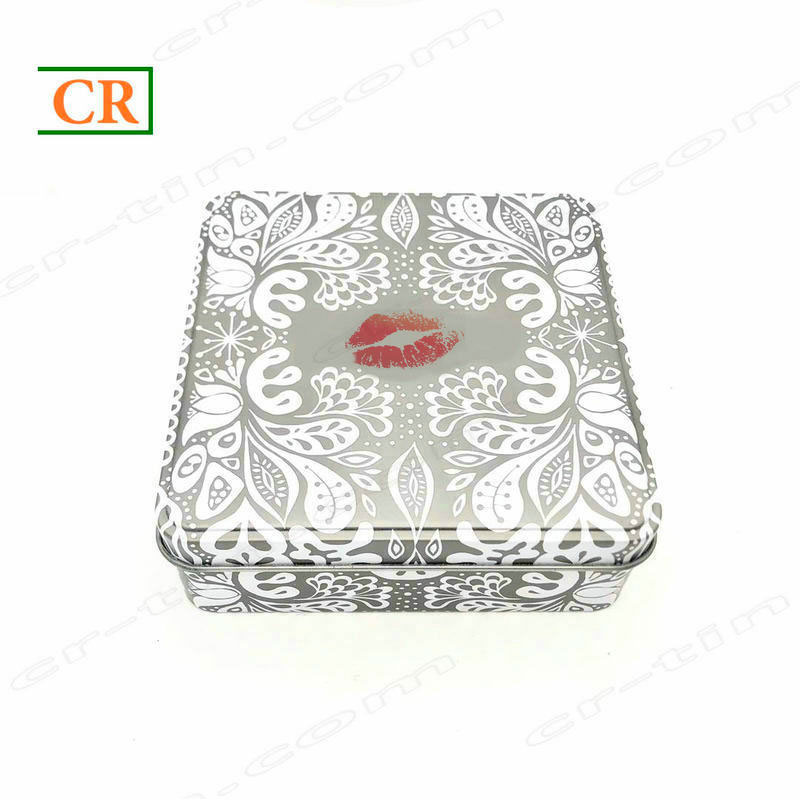 |
Real product reference What the Square Tin Box shows about usable spaceThe listed size is 125 × 125 × 45 mm outside and 121 × 121 × 43 mm inside. That gap is not a formula for every tin, but it clearly shows why the catalogue footprint and the usable cavity should not be treated as the same measurement. Check the internal dimensions, not only the outside size. Check the opening and lid profile when the product or insert is rigid. Confirm the exact mold with a drawing or sample before approval. |
|
Structure reference Why a hinged format needs more than a simple L × W × H checkThe open view makes the rim, hinge and local closure area easy to see. Those features may remove space only in one part of the cavity, so a product can have enough overall volume and still interfere at one corner. This is the kind of structure where the actual opening, hinge position and closing path matter just as much as the nominal dimensions. |
 |
There is no reliable “subtract X millimetres” rule for every tin. Corner radius, edge construction, lid style and closure geometry change from mold to mold. For a serious size decision, use the internal drawing or a physical sample of the exact format under review.
An Insert Can Change a Good Fit Into a Bad One
A tray does not only consume its own material thickness. Its base reduces usable height; sidewalls reduce length and width; folds, ribs, dividers and access features can take away still more space. The finished insert envelope is what matters.
This is also where “zero-clearance” CAD layouts often fail in practice. Products need enough room to enter without scraping or excessive force, but too much clearance creates movement and can make the presentation feel loose. The working allowance depends on the product surface, stiffness, dimensional variation and loading direction, so the final number is usually confirmed by sampling rather than a universal formula.
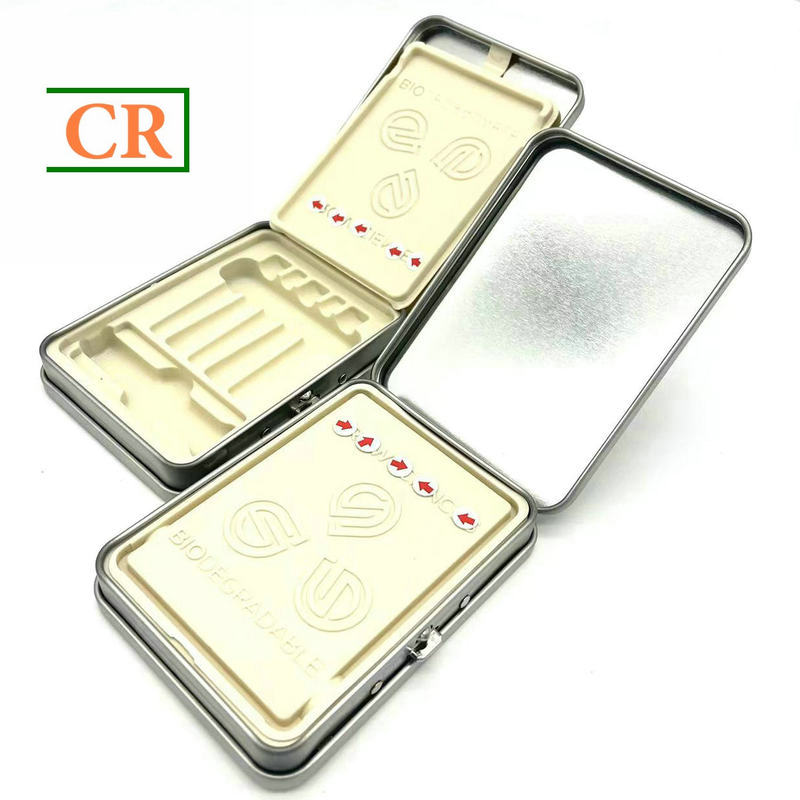 |
Insert allowance in practice Size the product to the finished insert, not the empty tinThis real CR Tin example shows the insert already occupying floor area and height before the product is loaded. If the tray is introduced after the metal size has been selected, a tin that looked generous on paper can become tight in actual packing. Check together: insert base, sidewalls, dividers, finger access, product variation and the final loading direction. Treat insert development and tin-size selection as one packaging decision rather than two separate steps. |
Removal space matters too
A product may drop into a cavity easily and still be frustrating to remove. Deep, smooth items are a common example: tight side clearance leaves nowhere for a finger to grip.
A pull tab, finger notch, raised platform or controlled side gap can solve that problem, but each changes the insert geometry. Define removal access before the internal size is locked.
Turn the Measurements Into a Useful Supplier Brief
“Product size: 80 × 40 × 15 mm” is rarely enough information to recommend a tin. It does not show whether those are maximum dimensions, whether wrapping is included, how many units are packed, or which way the product needs to face.
A short brief is more useful than a long specification document. For most early-stage reviews, the supplier mainly needs two groups of information:
|
Send these details Define the finished packFinished product size Maximum L × W × H with wrapping, caps or attached components. Orientation & pack count How the item sits and how many units form the final pack. Insert requirement Tray, divider, liner, wrap or no insert. |
Add useful context Show how the pack needs to workHandling needs Finger access, pull tab, clear surfaces or other removal requirements. Reference material Top/side photos beside a ruler, sketches, samples or insert mock-ups. Fixed vs flexible points Separate non-negotiable dimensions from preferred orientation or proportion. |
That distinction gives the supplier room to compare an existing mold, an insert adjustment or a new size without treating every preference as a hard constraint.
The Sample Is Where the Fit Becomes Real
A drawing can show that the geometry is plausible. It cannot fully show how the pack feels when an operator loads it, whether the highest point touches the lid, how much the contents move in handling or whether the customer can remove the product comfortably.
Use finished or production-representative products whenever possible. A prototype that is softer, thinner or smaller than production can make a marginal fit look acceptable.
Test the real packing sequence, not just the closed tin
Place the insert into the tin, load the intended quantity and close the lid using normal pressure. A fit that only works when one part is bent, twisted or carefully angled is unlikely to remain efficient during repetitive packing.
- Loading: the product should enter without scraping, catching or unwanted compression.
- Closing: the lid should move normally without local pressure on the highest points.
- Movement: gentle handling should not produce excessive shifting or rotation.
- Reopening: check the product, insert and internal surfaces for pressure marks.
- Removal: the product should lift out without excessive force.
- Partial pack: where relevant, remove one unit and see whether the remaining contents still sit as intended.
Approval rule: “It fits” is not enough. The size should also support repeatable loading, normal closure, controlled movement and practical removal.
Where Tin Size Decisions Usually Go Wrong
Most sizing failures are not caused by difficult calculations. They happen because one part of the real packing condition was left out too early.
- Using outside size as usable size: the opening, rolled edge, lid or closure reduces the working space.
- Measuring the bare product: wraps, labels, seams or caps are added later and increase the envelope.
- Checking only one sample: a smaller unit becomes the reference even though normal production varies.
- Adding the insert after the tin is chosen: the tray consumes space that was never reserved.
- Copying a fixed clearance rule: another project may have different stiffness, surface finish and loading geometry.
- Approving because the lid closes: the pack may still be hard to load, mark the product or trap it during removal.
FAQ
Should external or internal tin dimensions be used for product fit?
Internal dimensions should guide product fit, while external dimensions are more useful for shelf, carton and overall footprint planning. Even then, check the actual opening, rolled edges, hinges, lid overlap and local closure features rather than treating one nominal internal figure as the entire usable cavity.
How much clearance should be added around a product?
There is no useful universal millimetre allowance. The right clearance changes with product stiffness, finish, dimensional variation, insert construction and loading direction. Use dimensions to narrow the options, then confirm the working allowance with the exact mold and a physical sample.
Can an insert solve a tin that feels too large?
Sometimes. A raised platform, centred cavity, divider or revised tray can control presentation and reduce movement without changing the outer metal format. The insert still needs to preserve loading, closure and removal space, so the complete pack should be sampled before approval.
What should I send a tin supplier if I do not have a packaging drawing yet?
Send the maximum finished product dimensions, intended orientation, pack count and insert requirement. Add clear top-view and side-view photos beside a ruler if available. If the product varies in production, include several representative samples or the known dimensional range before the tin size is approved.
Next step
Send the Product, Not Just a Target Tin Size
For a useful size review, prepare the maximum finished length, width and height, pack count, intended orientation and any insert requirement. A simple top-view photo or sketch makes the arrangement easier to understand.
CR Tin can then compare those details with available tin container formats, check the usable internal space and decide whether an existing mold, insert adjustment or sample review is the better next step.
| Send Product Dimensions → | Review Tin Packaging Options |
Post time: Sep-05-2026