
A mint tin can look ready for production at first glance: the print is sharp, the lid is aligned, and the brand colors seem right. But once the intended contents go inside, a tight closure, awkward opening, misplaced artwork, or poorly fitting insert can change that verdict. Sample approval is where those practical problems should surface, before they become production questions.
That is why the physical tin needs to be reviewed alongside the intended contents, approved drawing, released artwork, insert requirements, and packing instructions. The mints packaging range offers useful starting points for comparing shapes and opening styles, but each project still needs approval against its own controlled references.
The practical answer
A mint tin sample is ready for approval when it fits the intended contents, works as expected, matches the agreed artwork and finish, and has a clear record of what was accepted. Any unresolved issue needs to remain visible—not disappear behind a general “looks good” comment.
The first risk is often a mismatch between the sample and the files used to judge it. A tin may be perfectly acceptable in isolation but belong to an older drawing or artwork revision. Recording the sample ID alongside the drawing, artwork, insert, and packing references makes the decision traceable.
Function and appearance can tell different stories. A beautifully printed tin may still pinch its contents or resist opening; a smooth-closing tin may carry outdated artwork or the wrong carton marking. Both sides need their own decision.
The wording of the feedback matters, too. “Logo shifted toward hinge side” tells a supplier what to investigate. “Looks slightly wrong” gives the next person little to compare, especially after the sample changes hands.
Fit starts with measurable space
Dimensions, Capacity and Loading Fit
Dimensional approval should start with the released drawing rather than a catalog description. External dimensions affect sleeves, display components, secondary packaging, and carton planning. Internal clearance, however, determines whether the intended contents actually fit after the metal has been formed and assembled.
For that reason, measurement points should be defined before numbers are recorded. A dimension taken across a rolled edge can differ from one measured across a straight wall. Likewise, internal depth beside a hinge, shoulder, curl, recess, or formed feature may differ from the clear center area.
Where dimensions matter most
A practical inspection does not require random measurements across every visible surface. Instead, attention should stay on features that affect product fit, insert location, closing action, artwork position, or secondary packing. The measuring tool should also suit the tolerance specified on the controlled drawing.
- Overall length, width, diameter, or other controlled outside profile.
- Closed height and any formed area affecting secondary packaging.
- Usable internal length, width, and minimum depth.
- Hinge, curl, bead, shoulder, or recess affecting product clearance.
- Insert locating areas and important assembly positions.
- Artwork position when the project drawing controls distance from a structural feature.
Use the real contents for capacity approval
Theoretical volume cannot show how individual pieces settle inside a finished container. Instead, the loading trial should use the intended quantity, actual product geometry, wrapping method, loading direction, and any internal paper, tray, or insert. For mint tins, also confirm whether the contents contact the metal directly or remain inside a separate liner or bag. The appropriate food-contact documentation should be checked for the intended use and market; a visual sample check alone does not establish compliance.
After loading, the package should close normally without repeated rearrangement. Visible pressure against the lid, compressed contents, uneven seating, or interference with formed areas should remain open review points. In addition, the package should be reopened and the contents checked for rubbing, crushing, wrapper damage, or difficult removal.
A useful approval photograph shows the normal loading arrangement before closing. Another photograph immediately after reopening can reveal movement or contact marks. Together, those two views create a stronger record than a simple statement that capacity is acceptable.
Handle the finished structure
Opening, Closing and Edge Condition
An aligned lid does not always mean an easy-to-use tin. Opening and closing the sample a few times can reveal scraping, binding, twisting, or a closure that does not engage consistently—issues a still photograph will miss. These ordinary handling checks help identify immediate problems; they do not amount to a durability test.
During each movement, observe how the opening begins, travels, stops, and returns. Any abnormal contact should be described at the exact location. This makes a later comparison much more useful than general terms such as “tight,” “loose,” or “not smooth.”
What everyday handling can reveal
- Observe the closed state. Check general lid position, corners, gaps, and alignment.
- Begin opening normally. Note initial resistance and natural finger access.
- Complete the full travel. Watch for rubbing, twisting, catching, or disengagement.
- Access the contents. Confirm that the opening creates a practical removal path.
- Close without correction. The structure should return to its intended position without manual realignment.
Meanwhile, repeat the same sequence with the intended contents inside. Product pressure may change the final seating position. An insert or paper component may also shift into a moving area even when the empty sample operates normally.
Inspect edges where fingers actually travel
Edge inspection should concentrate on rolled areas, corners, opening points, hinge ends, seams, curls, and other formed transitions. Under suitable light, look for visible burrs, splits, rough projections, coating damage, or abnormal deformation.
However, a visual and tactile inspection should not be presented as formal safety certification. When a project requires a specific test method, that method needs its own approved procedure. The checklist should record the observed condition and the reference used for acceptance.
Physical references for QC discussion
Loading and Opening Examples
Different structures expose different inspection points. The images below come from their corresponding product detail pages and are included only where the visible structure helps explain a sample-review decision.
|
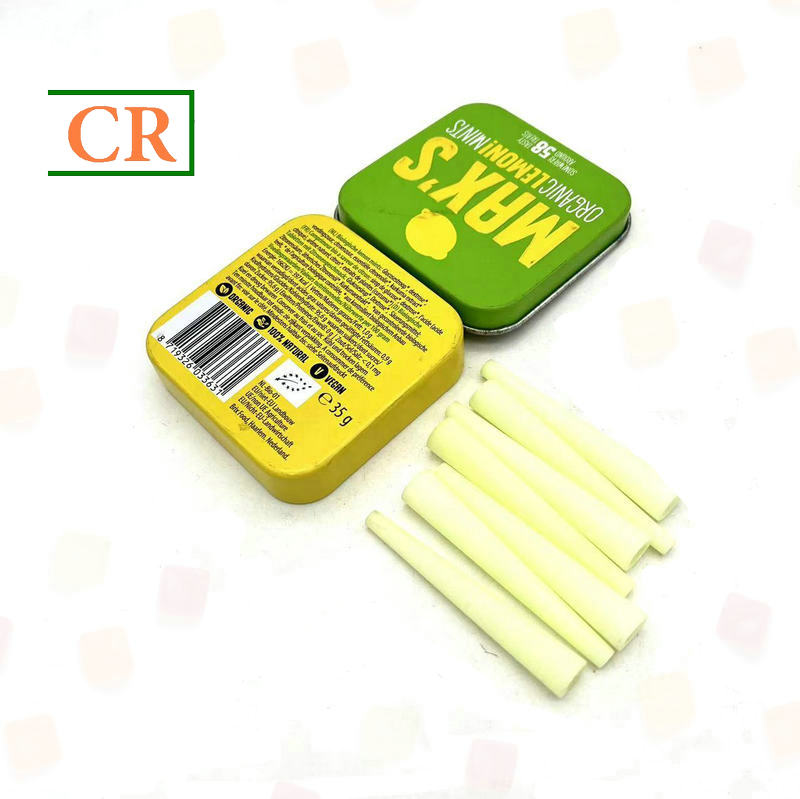
Loading reference Square Mints Tin CaseThe printed tins and loose contents offer a visual reference for product orientation, exterior labeling, and presentation. Usable internal space and closing clearance still need to be checked with the intended contents inside a physical sample. |
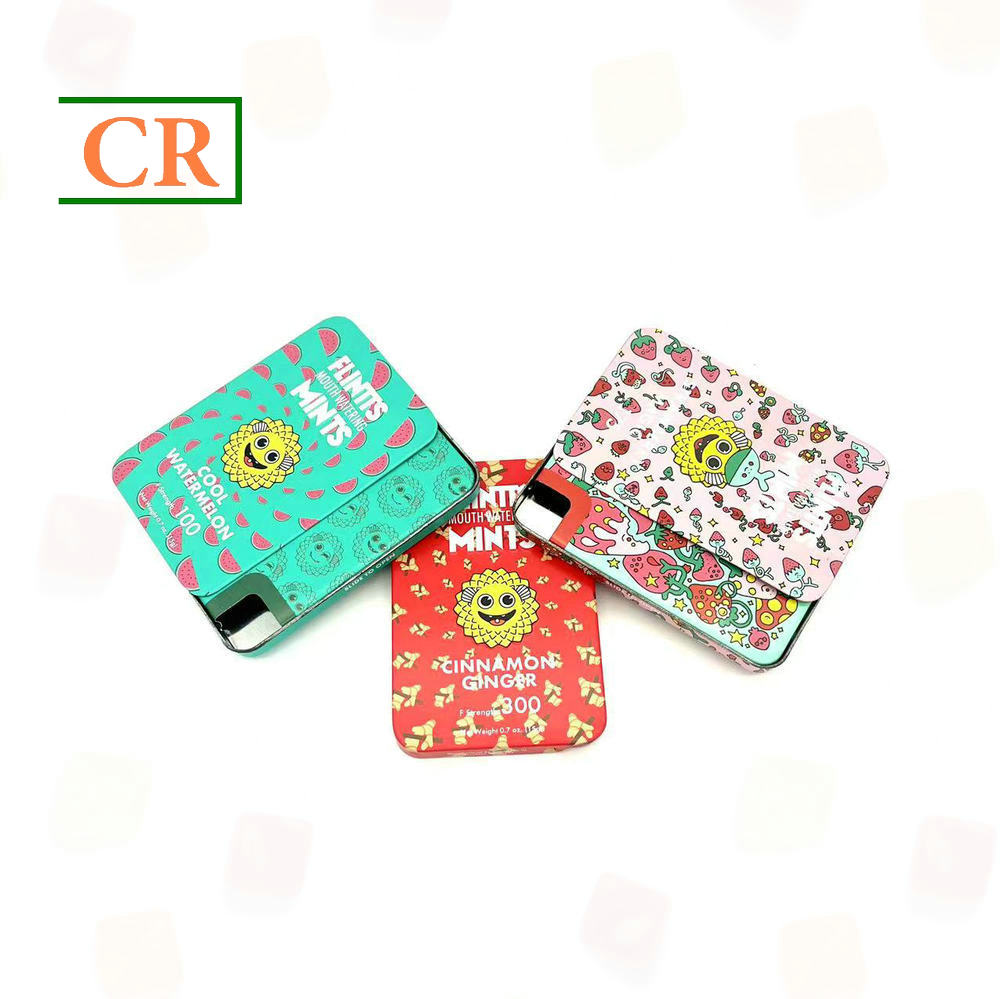
Opening reference Slide Mints Tin CaseSeveral partly opened positions make slide engagement, exposed edges, opening clearance, artwork near the moving area, and lid-to-base alignment easier to review. |
Separate artwork from appearance
Printing, Color and Surface Finish
Print approval becomes more reliable when artwork content, position, color, and finish are reviewed separately. Otherwise, an attractive overall result may distract from a wrong revision, incorrect panel orientation, missing line of text, or shifted graphic.
A side-by-side comparison with the released artwork can catch the less obvious mistakes: an outdated logo, a reversed panel, missing small print, or barcode artwork from the wrong revision. These details are easy to overlook when attention is drawn to the overall design.
Why artwork can shift after forming
Flat artwork can hide visual movement created by forming. A centered graphic on a dieline may appear closer to one edge after the metal becomes three-dimensional. For this reason, critical logos, borders, text blocks, and color boundaries should be reviewed on the finished part.
Corners and narrow side areas deserve particular attention. A line that looks even on screen can lose visual balance after it wraps around a radius. Similarly, small information close to a formed edge may become harder to read under normal viewing conditions.
Approve print color against a defined reference
Screen appearance should not silently become the final color standard. Instead, the approval record should identify the agreed physical or documented reference. Critical brand colors can then receive specific attention under consistent viewing conditions.
Large backgrounds and small graphic areas should also be viewed separately. Broad color fields may reveal variation that remains difficult to notice inside a small logo. At the same time, reflections around formed metal edges can alter perceived lightness or saturation.
Why finish changes the color you see
Gloss, matte, metallic appearance, and other specified surface effects can change perceived color. Consequently, approving print color should not automatically approve finish. The surface should be viewed from several angles so reflection changes do not hide inconsistent areas.
Look for unexpected scratches, streaks, contamination, pinholes, handling marks, or obvious finish variation. Formed corners and edges deserve extra attention because those locations can show changes more clearly than a broad flat panel.
Review relief in three dimensions
Embossing or Debossing Details
Embossing raises a selected feature, while debossing creates a recessed effect. During sample approval, however, simply confirming that relief exists is not enough. Position, definition, print registration, nearby deformation, and internal clearance all influence the finished result.
When relief follows printed artwork, view the feature directly from above and then under angled light. A small register difference often becomes easier to see when the printed edge and physical highlight no longer follow the same path.
Judge definition before requesting stronger depth
Small letters, narrow borders, enclosed spaces, and fine lines behave differently from larger graphic areas. More depth does not automatically create a better result. In some designs, stronger relief can reduce fine definition or change the surrounding surface.
For that reason, any request to strengthen or reduce the effect should connect to a revised physical sample or a clearly documented tooling instruction. Subjective comments such as “make it more premium” provide little guidance unless the desired physical change is defined.
Check the area around the relief
The surrounding flat surface matters as much as the raised or recessed feature. Unexpected distortion, coating damage, scuffing, or print movement can reduce visual quality even when the relief itself appears clean.
Meanwhile, the reverse side should also receive attention when internal clearance is limited. A tooling change may alter the inside surface and create new contact with the contents, liner, or insert.
Clear photographs should record both straight and angled views. If the intended effect is deliberately subtle, that decision should also appear in the approval note so a later inspection does not expect a stronger result.
Retention and access work together
Insert Fit and Product Removal
A snug insert may keep mints neatly arranged, but that benefit disappears if a customer has to struggle to remove them. The tradeoff between retention and access is easiest to judge with the insert seated in the finished tin and the actual contents—or an approved dimensional reference—in place.
A standalone insert can appear correct on a worktable yet behave differently after assembly. Wall taper, formed corners, hinge clearance, relief features, adhesive location, and lid clearance may all change the final relationship.
When an insert fits on paper but not in the tin
Place the insert in its intended orientation without forcing it into position. Once seated, observe whether it rocks, bows, lifts, twists, or moves toward a hinge or opening path. Any locating tabs, folds, adhesive areas, or other assembly features should match the controlled insert reference.
- Correct orientation inside the finished metal structure.
- Movement from front to back and side to side.
- Corner seating and visible perimeter gaps.
- Interference with a hinge, lid, or sliding component.
- Clearance above the loaded contents.
- Visible tearing, rubbing, permanent creasing, or deformation after assembly.
Test retention and removal separately
A cavity can hold a product securely while still creating an awkward removal experience. For that reason, product access should receive its own checklist item. Finger clearance, lifting direction, insert flexing, and rubbing against the product surface should all be observed.
In addition, repeat the removal check after one or more pieces leave the package. A partly empty configuration can allow extra movement. The last remaining item may also be harder to reach than the first.
Formal drop, vibration, or transport testing should remain separate unless a controlled project method defines it. Normal sample handling can reveal obvious movement, but it should not become an unsupported statement about shipping performance.
Continue beyond the individual unit
Carton, Packing and Marking Information
A pristine sample does not guarantee a pristine delivery. Printed lids can rub against other tins or packaging components once units are stacked and packed. Where the project includes a defined packing configuration, that arrangement deserves approval alongside the individual tin.
A useful approach is to document the packing sequence from the individual unit outward. This makes missing separators, protective sheets, sleeves, liners, trays, or orientation instructions easier to identify before a larger quantity enters packing.
Where packing can damage a good finish
Direct metal-to-metal contact deserves attention where broad decorated panels sit together. In addition, protective components should remain in the intended position during ordinary handling. A separator that shifts away from the printed lid may no longer protect the area it was designed to cover.
- Individual protective method where one is specified.
- Orientation inside an inner pack or master carton.
- Approved count per layer and carton.
- Separators, trays, sleeves, liners, or other required components.
- Potential rubbing between decorated surfaces.
- Photographs showing important stages before the outer carton closes.
Review carton marking line by line
Carton marking should follow the released packing instruction rather than an old template. Project identification, quantity, carton sequence, destination information, barcode data, dimensions, weight fields, date information, or handling marks should appear only where the controlled project information requires them.
Temporary sample-shipment information should also be identified clearly. Otherwise, a convenient temporary label can accidentally become the reference copied into production.
Do not turn a packing mock-up into an unsupported test claim.
A neat sample carton can demonstrate the intended arrangement, separation, and marking. However, formal transport, compression, or vibration performance should be documented separately whenever those tests form part of the project.
Make the decision traceable
Approval Record and Retained Sample
A physical sample loses much of its value when the revision it represents becomes unclear. Accordingly, the accepted piece should connect to the drawing, artwork, insert reference, packing instruction, photographs, comments, and approval date used during the review.
Partial approval should also remain visible. Dimensions and closing action may be acceptable while color remains under correction. Recording those statuses separately prevents a general signature from approving an unfinished characteristic.
Build an approval sheet another team can understand
A useful approval record does not require complicated software. However, another team should be able to open it later and understand what was checked, which reference controlled the decision, and what evidence supports the final status.
Use clear approval status language
Terms such as “approved,” “revision required,” “pending information,” and “approved deviation” communicate more clearly than “looks fine.” If a deviation receives acceptance, the record should describe exactly what differs from the original reference.
Open items should also remain visible instead of disappearing inside a long comment. A separate status and required action for each unresolved point creates a practical closure list before production release.
Keep one clearly identified physical reference
A retained sample preserves information that drawings and photographs cannot fully communicate. Closure feel, surface appearance, relief definition, actual loading relationships, and assembly behavior remain easier to compare in three dimensions.
For that reason, the retained piece should connect to the correct project reference, drawing revision, artwork revision, date, and approval status. Whenever the artwork, dimensions, tooling, finish, insert design, or packing changes, the validity of that retained piece should be reviewed again.
Final five-minute review
Sample Release Checklist
After a detailed review, small unresolved points can disappear behind larger corrections. A short release check helps confirm that the physical sample, controlled files, and written decision still describe the same version.
|
Match revisions Confirm that the drawing, artwork, insert, packing instruction, and physical sample belong to the same intended version. |
Close open items Before production release, resolve release-critical issues or obtain a documented, authorized deviation where permitted. Any remaining non-critical item needs a clear owner, next action, and status. |
Save evidence Keep measurements, loading photos, detail images, artwork revisions, and comments together. |
|
Identify the sample Apply enough project information to prevent revision confusion after storage. |
Protect the reference Store the physical piece where scratching, crushing, contamination, or accidental substitution is unlikely. |
State the decision Use clear approval wording instead of relying on informal messages or memory. |
Sample approval questions
FAQ
What should be measured on a mints packaging sample?
Measurements should follow the released drawing and focus on characteristics affecting loading, closure, assembly, or secondary packing. Relevant outside dimensions, closed height, usable internal space, and important formed areas commonly deserve attention.
The measurement location should also be recorded. A value taken across a rolled edge can differ from one across a straight wall, so the number alone may not provide a repeatable QC reference.
How should print color be approved?
The physical sample should be compared with the agreed color reference under consistent viewing conditions. Critical brand colors should receive separate attention from large backgrounds and smaller secondary graphics.
Surface finish should remain a separate approval point because gloss, matte, metallic appearance, and viewing angle can change perceived color.
What insert checks are needed before approval?
Insert inspection should cover orientation, seating, lid clearance, product retention, movement, assembly behavior, and removal access. The actual contents or an approved dimensional reference should form part of the trial.
In addition, the package should be checked after one or more pieces are removed because a partly empty configuration can behave differently from a fully loaded one.
Why should an approved physical sample be retained?
A retained sample preserves physical information that drawings and photographs cannot fully communicate. Closure feel, surface appearance, relief definition, actual loading relationships, and assembly behavior remain easier to compare physically.
However, the physical reference should remain connected to controlled documents. When dimensions, tooling, artwork, finish, insert design, or packing changes, its approval status should be reviewed again.
Before production handoff
Turn the Approved Sample into a Repeatable QC Reference
The value of an approved sample goes beyond the signature on the review sheet. It gives production and QC teams a shared reference for what the tin should look like, how it should handle the contents, and which drawing, artwork, and packing requirements were agreed.
Photographs capture the evidence, while a clearly identified retained sample preserves the feel of the closure, surface finish, and formed details. Together, they make later checks easier to repeat without relying on someone’s memory.
- Measure against controlled references. Record the revision, measurement point, loading condition, and any accepted deviation.
- Approve function and appearance separately. Closure, edge condition, loading, color, relief, and insert behavior should remain distinct decisions.
- Keep a traceable retained reference. Link the physical piece with photographs, revisions, comments, approval status, and packing information.
Next step
Request a Sample with the Approval Criteria Defined
A useful sample request can include product dimensions, intended loading quantity, current artwork, critical color references, embossing or debossing instructions, insert requirements, and packing expectations. Important QC points can also be identified early when graphic alignment, product removal, closing action, or carton marking deserves extra attention.
With those references available, the final mint tin sample can be evaluated against the same checklist used during the later QC handoff. This creates a clearer connection between physical approval, retained sample, and production inspection.
| Request a Sample → | Review Mints Packaging |
Post time: Oct-30-2026